A Complete Guide for using Compute Canada with Julia!
This is a Julia version of Compute Canada tutorial. Thanks to the author of Python version. Here is the markdown and pdf version.
- A Complete Guide for using Compute Canada with Julia!
1. Introduction
Compute Canada is Canada’s national high-performance compute (HPC) system. The system gives users access to both storage and compute resources to make running large data analyses more efficient than on a standard desktop computer. Users can access Compute Canada from any computer with an active internet connection.
The following information help users get start with Compute Canada by walking through the Niagara cluster (a homogeneous cluster, owned by the University of Toronto and operated by SciNet). We provide detailed examples with Julia, if you are using Python, please refer to this Python version of tutorial.
1.1. Terminology
Throughout this Julia version of tutorial I will use the same terms with this Python version of tutorial. This section provides a brief explanation of these terms.
- Local: This refers to anything that you own or have in your personal computer or file structure that is not on Compute Canada or any other computer outside of your personal network (whatever is inside your own home). For instance, your local machine is your personal MacBook, ThinkPad, etc that you use for your personal work, entertainment, etc. A local file is a file stored on your personal computer.
- Remote: This refers to anything that is on a network or machine outside your personal network. In this tutorial this will mostly refer to the ‘remote machine’ or ‘remote server’, which refers to the specific node you are using on Compute Canada. In general it refers to the compute infrastructure that you are accessing using the internet.
- Cluster: Compute Canada offers several clusters. A cluster is a collection of computers that shares some properties, such as the location of the cluster. The computers within a cluster are usually interconnected and will have the same file structure so you can access all your files on any computer within a cluster. A node is another term for a computer within a cluster. In this tutorial we will be using the Niagara cluster on Compute Canada, as it has many nodes with high memory GPUs which are suited for deep learning.
- Node: A node refers to a computer within a cluster. You typically use one or more nodes when you submit or run a job on Compute Canada. You can specify how many CPUs and GPUs your job needs to access, and for how long, on each node.
- Shell / Terminal: This refers to the program and interface running on your local computer or the remote node which lets you control the computer using only text-based commands. Using the shell/terminal is fundamental for using Compute Canada as you cannot control the node on Compute Canada using graphical or cursor-based interfaces as you normally would on your personal computer. It is a good idea to get familiar with using the terminal in general, and I hope this tutorial helps you get started on this journey. If you want to learn these skills in more depth, this is a great website which provides tutorials covering things like the shell, command-line environments: https://missing.csail.mit.edu/
1.2. Useful Links
- Official Wiki
- Official Guickstart
1.3. Notes
- All clusters of Compute Canada shares almost the same procedure except for small difference in batch job scripts. See Links.
- If there are any errors, please search the official wiki first, then refer to technical support.
2. Setting up your environment
2.1. Getting a Compute Canada account
Before you begin, you will need to register for a Compute Canada (CC) account, which will allow you to log in to CC clusters. You need to sign up on CCDB , and you will need a supervisor (like your PhD supervisor) to sponsor your application. This process can take 2-5 days so it’s best to do this as soon as possible.
If your supervisor does not have a CC account, they will first need to register using the same website. Once they have been approved you can apply for your own account. You will need to provide your supervisor’s CCDB ID, which is usually in the form abc-123.
Specially, while you can also compute on Niagara with your Default RAP, you need to request access to this cluster. Go to this page, and click on “Join” next to Niagara and Mist.
2.2. SSH keys
Secure Shell (SSH) is a widely used standard to connect to remote servers in a secure way. SSH is the normal way for users to connect in order to execute commands, submit jobs, follow the progress of these jobs and in some cases, transfer files.
There are three different connections for which you need to set up SSH keys:
- Between your local machine and your Compute Canada account (used for login)
- Between your local machine and GitHub/GitLab (used for Git synchronization only, refer to the github tutorials)
- Between your Compute Canada account and GitHub/GitLab (used for Git synchronization only, refer to the github tutorials)
The steps for the three connections are the largely the same, and here I will outline them for the connection between your local machine and your Compute Canada account. More details can be found here.
Generate an SSH key on your local machine (you can skip this step if you have previously generated an SSH key)
Step 1: check if you have an existing SSH key on your local machine by looking at the following folder
~/.ssh (Linux or Macos),C:\Users\username\.ssh (Windows). If you see two files which are named similarly toid_ed25519andid_ed25519.pubthen you don’t need to generate new keys (skip this step).Step 2: If you don’t have an existing key, generate one by doing (if
ssh-keygennot work on Windows, please refer to Link):1
ssh-keygen -t ed25519 -C "your_email@example.com"
Upload the SSH public key (e.g.
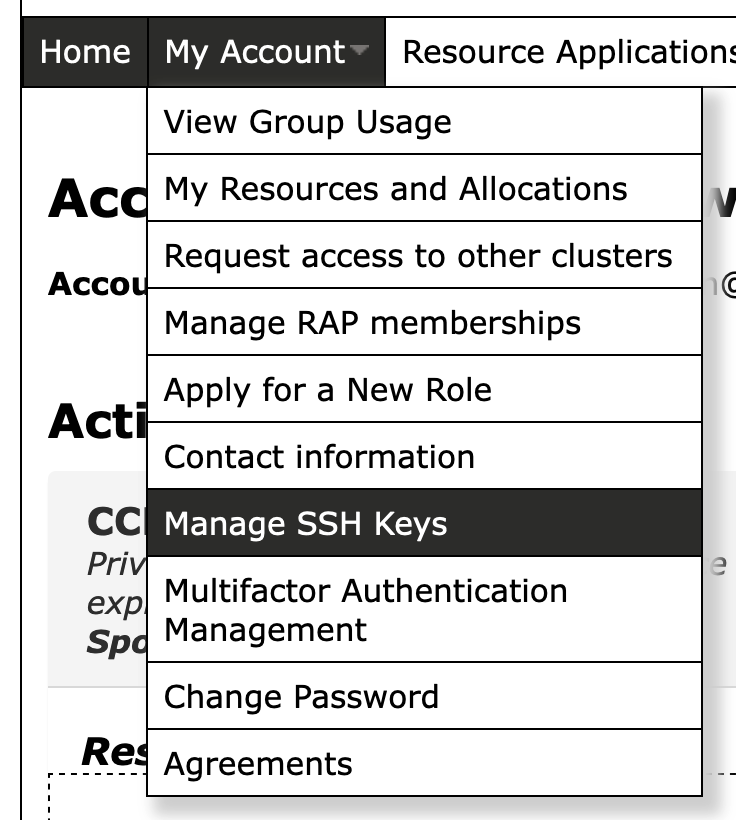
id_ed25519.pub) to Compute Canada (Please keep your private key safely (e.g.id_ed25519)).- STEP 1 - Go to the CCDB SSH page. Or via the CCDB menu:

- STEP 1 - Go to the CCDB SSH page. Or via the CCDB menu:
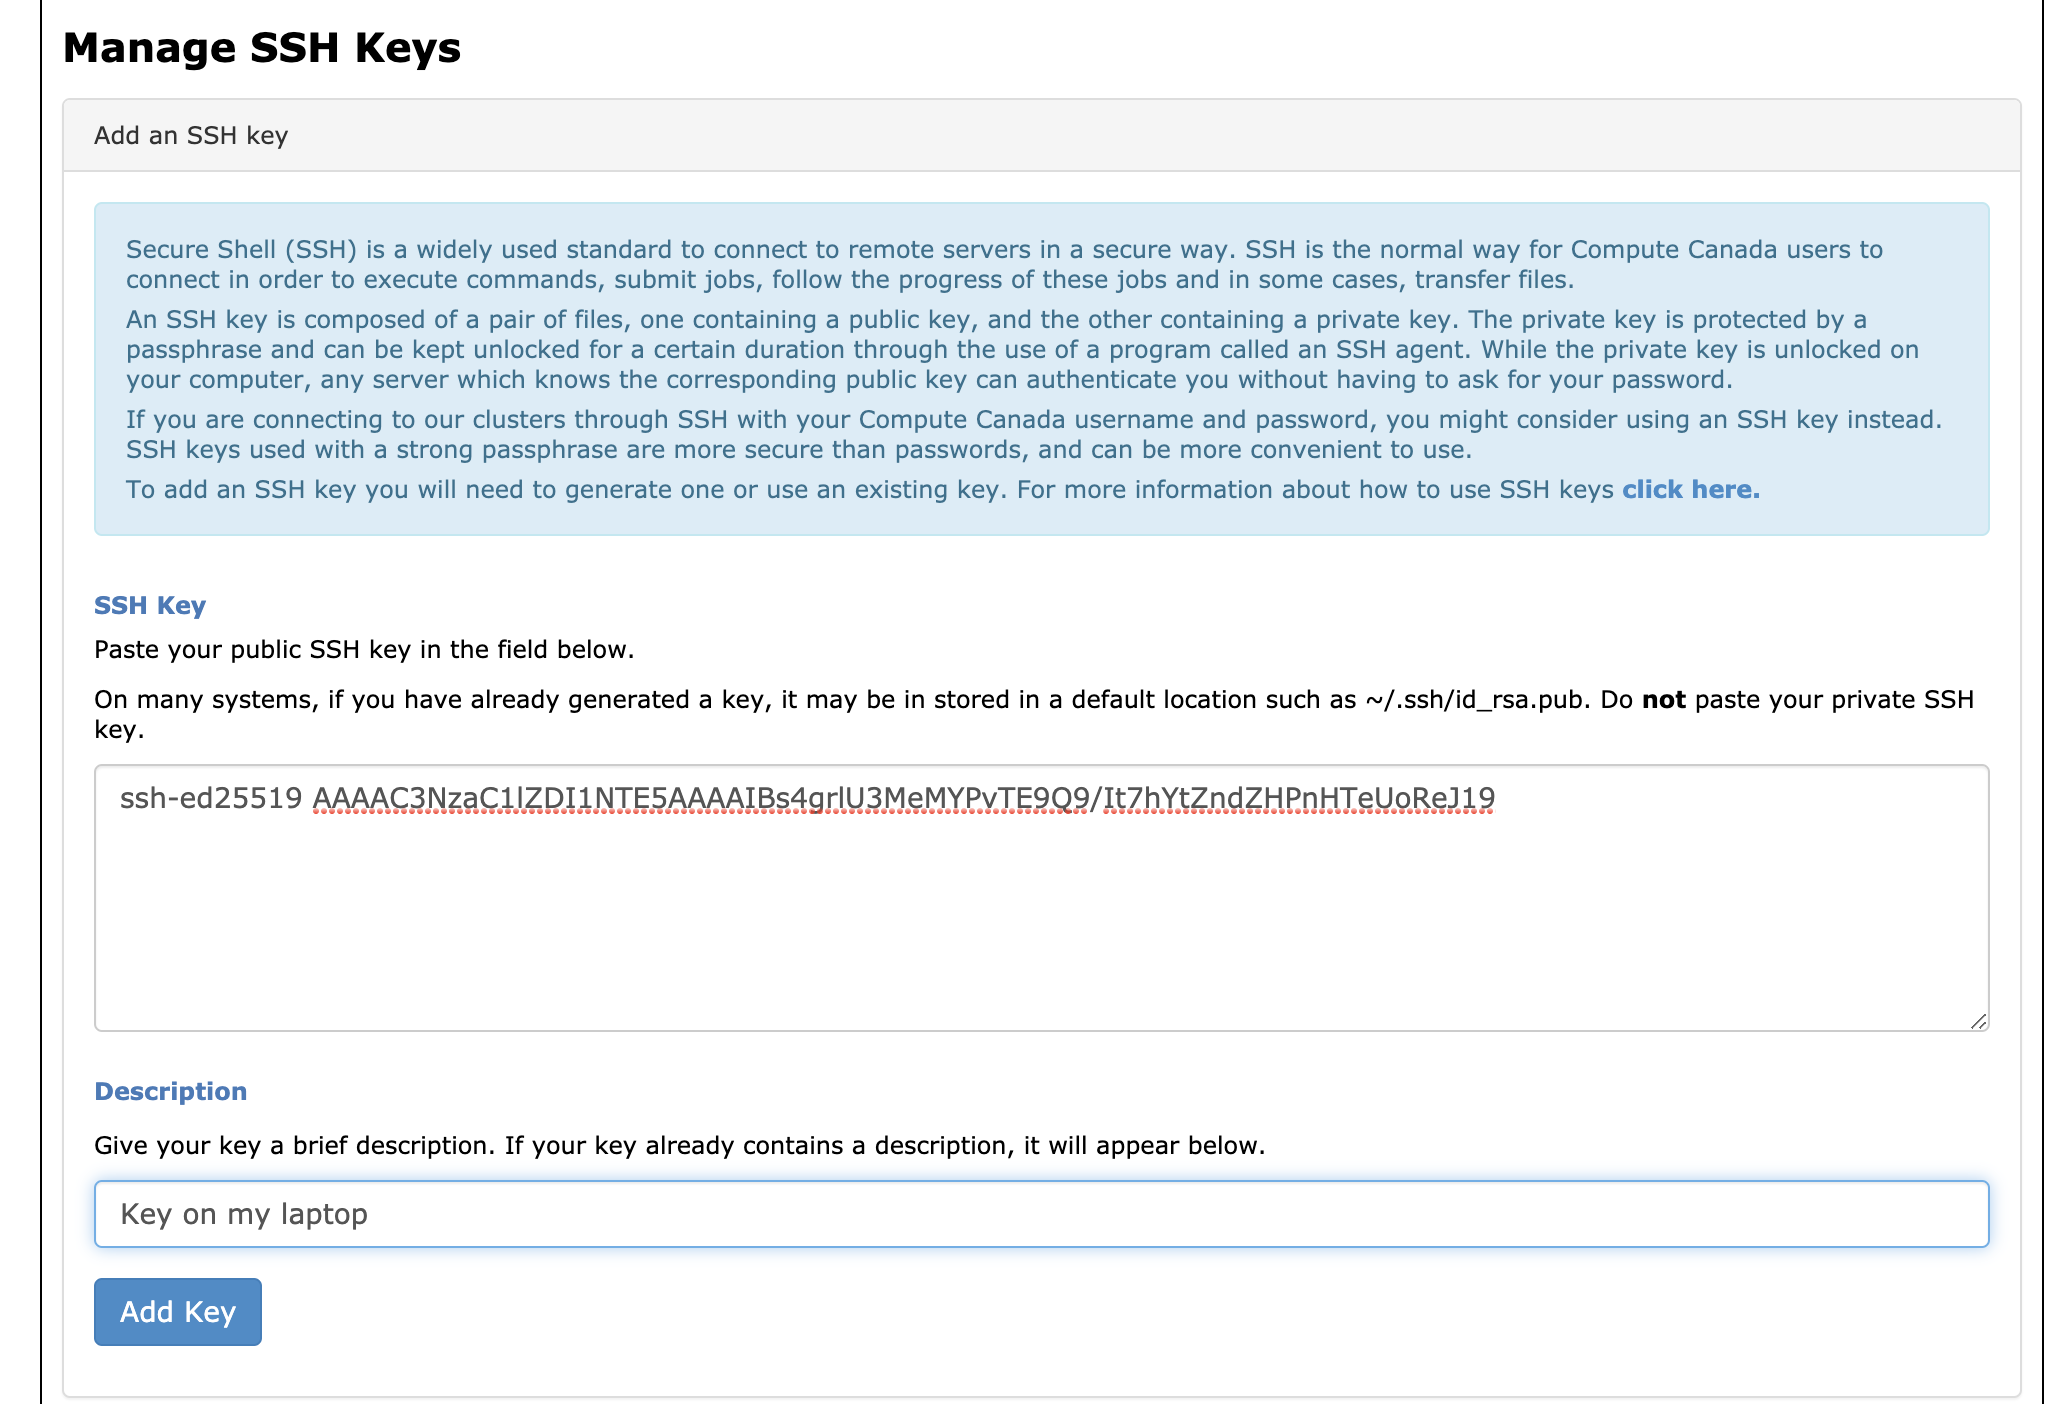
- STEP 2 - Open your SSH public key with Notepad (e.g.
id_ed25519.pub), copy the public key into CCDB form:

After clicking “Add Key” your SSH key will show up in the section below.

2.3. Logging into the systems
- Open a terminal window
- then SSH into the Niagara login nodes with your Compute Canada credentials:or
1
ssh -i /path/to/ssh_private_key -Y username@niagara.scinet.utoronto.ca
1
ssh -i /path/to/ssh_private_key -Y username@niagara.computecanada.ca
- Example:
1
ssh -i C:\Users\username\.ssh\id_ed25519 -Y username@niagara.computecanada.ca
3. File systems and transfer
3.1. File systems
You have four kinds of directory on the Compute Canada clusters. Each cluster has different sizes and rules for each kind of directory. Please refer to the wiki page of each cluster for more details. Generally speaking, you are recommended to use Project directory to develop your project.
Their paths on the Nigara cluster are:
1 | $HOME=/home/g/groupname/username |
3.2. File transfer
- use scp to copy files directories
1
2
scp file username@niagara.computecanada.ca:/path
scp username@niagara.computecanada.ca:/path/file localPath - For windows,
WinSCPcan be used for file transfer
3.3. Git for codes
The optimal way to ‘transfer’ codes such as Julia files, Jupyter notebooks, and generally any text-based files, is to use Github. You should commit and push changes from your local machine and then pull them on Compute Canada to ensure you have the latest version of your code (and vice-versa if you are editing on Compute Canada and want your local machine to have the latest version).
Please refer to the tutorials from Compute Canada and Github.
4. Software modules
4.1. Loading software modules
You have two options for running code on Niagara: use existing software, or compile your own.
To use existing software, common module subcommands are:
module load <module-name>: load the default version of a particular software.module load <module-name>/<module-version>: load a specific version of a particular software.module purge: unload all currently loaded modules.module spider(ormodule spider <module-name>): list available software packages.module avail: list loadable software packages.module list: list loaded modules.
To compile your own, please refer to the official wiki, such as CPLEX, Gurobi.
4.2. Setting up Julia enviromnent
Here is the typical steps to setup the Julia enviroment:
1 | module load julia |
This is a one-time operation. Once you have added all the Julia modules, you can use then from now on by only typing module load julia.
- Specially, if you want to use your own Julia modules, you need to precompile your own Julia modules before submitting the jobs by: in which the
1
julia pre_load.jl
pre_load.jlshould be like:1
2
3
4
5
6
7# This is the file for precompiling self-created packages in niagara system
if !("src/" in LOAD_PATH)
push!(LOAD_PATH, "src/") # path to your-own-module
end
using you-own-module1, you-own-module2, ...
5. Submitting jobs
5.1. Basic rules
As described at the very beginning, Niagara is a cluster, which is a collection of nodes (computers) which are connected to each other. When you log into Niagara, you are logging into a ‘head’ node or a ‘log-in’ node. This node itself does not have the resources (memory, CPU, GPU) to run computations that are even a little demanding. It is not appropriate to run any computations on the log-in node, and this is actively discouraged.
There are several hundreds of compute nodes on which you are allowed to run jobs, however to do this you need to submit your program/script as a ‘job’. In addition to providing the command necessary to run your job (e.g. julia testing.jl), you also need to provide details of what types of resources you need to use and for how long, so the scheduling system on Niagara can appropriately allocate resources for your script.
Niagara uses SLURM as its job scheduler. More-advanced details of how to interact with the scheduler can be found on the Slurm page.
5.2. Job scripts
Job scripts are terminal scripts (e.g. xxx.sh) to describe the resourses you need for your job and the real running command.
1 | ! /bin/bash |
After creating the terminal script (e.g. xxx.sh), type the following command in the terminal:
1 | sbatch xxx.sh # submit the job |
5.3. Interactive jobs
Interactive jobs are also supported, and you can do data exploration, software development/debugging at the command line:
1 | salloc --time=1:0:0 --nodes=1 --ntasks-per-node=15 --mem-per-cpu=4gb |
5.4. Demo
Here is a demo of model predictive control problem in Julia, please setup the Julia environment before running this demo.
Here is the Julia file MPC.jl:
1 | #import Pkg |
Here is the job scripts runjob.sh:
1 | !/bin/bash |
Here is the whole procedure to submit the job (runjob.sh and MPC.jl should be in the same directory), please setup the Julia environment before running this demo:
1 | module load julia |
6. Monitoring jobs
The most basic way to monitor your jobs is to use the squeue command. This will tell you whether your CC job has started or is queued, as well as how much time is left if it has started:
1 | squeue -u username # list all current jobs |